Beach diving requires a particular set of skills, techniques that are adapted to the challenges of shore entry, shore exit, and everything in between.
A good plan reduces the number of decisions you must make underwater.
If you are a certified, experienced scuba diver, you already possess the skills required for 80% of beach diving. Proficiency in descending, moving underwater, maintaining buoyancy, managing breathing gas, basic navigation, situational and team awareness, and ascending is assumed. If you lack mastery in any of those key areas, you may want to consider a training refresher course or some personal time with an instructor, to polish those skills. Your dive buddy will not appreciate learning that you have difficulty making a controlled descent when you are both 500 yards offshore.
The remaining 20% of your skill set should be taught in scuba certification courses but they are not required by most agencies. These skills include surf entry and exit, advanced underwater navigation, surface propulsion, self-rescue, basic scuba rescue, and resource management. Some instructors and some shops add this instruction when training their basic open water students, and their graduates tend to be better prepared for all manner of future dive experiences. Unfortunately, such training is rare, with the result being most newly certified divers are ill-prepared for beach diving
Dive students were required to learn these skills in scuba certification courses in the early decades of the sport. For example, the YMCA NAUI training manual from 1968, mostly featured shore entries for lakes and oceans. Open water courses generally lasted several weeks and included classroom instruction, several written examinations, and lengthy confined water training sessions developing skill proficiency before open water dives were attempted. Of course, not all students earned a C-card.
Eventually, as shops and agencies realized they could build their customer base by abbreviating certification courses, they removed some of the more stringent requirements. Some skills were relegated to advanced diver courses, including buoyancy proficiencies, effective navigation, and limited visibility/night diving. Basic rescue techniques were pushed even further down the training schedule to rescue diver certifications. Some skills, such as shore entry and exits became specialty courses.
It is not unusual to meet veteran divers and instructors who have never entered the water except from a boat. If you are among that number, don’t feel bad: you have a lot of company. The good news is the techniques necessary for safe, effective beach diving are both easy and fun to learn! The following pages will describe those techniques, and help you understand their purpose and practice.
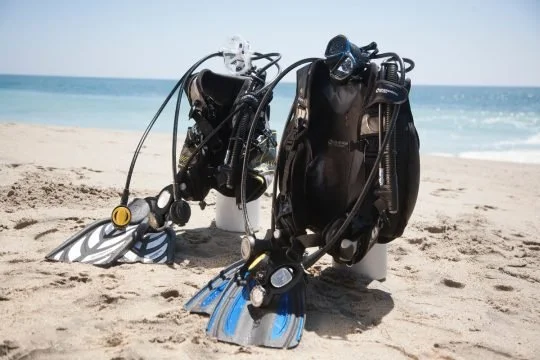
GEAR ASSEMBLY
Beach divers choose their own method for when and how they assemble their gear. The two basic choices are to gear up near your vehicle and walk to the water carrying your fins or carry the gear separately to a tarp near the water, assembling and donning the gear at that location prior to entry. It is mostly a matter of personal preference with a few variables to consider.
Beach assembly requires a secure tarp that both defines the staging area and protects the sensitive gear from contamination. During the multiple trips from the vehicle transporting various pieces of equipment, the tarp must remain in place without flapping in the wind and whipping up sand and dirt. Some popular dive sites feature picnic tables or assembly platforms but most location will not be so well appointed.
Tarps must be large enough to contain all one’s equipment and have room to stand or kneel on a clean surface. Clever divers learn to carry a few additional weights to place on the four corners and elsewhere, anchoring the edges against the wind. When selecting a tarp, err on the side of too large rather than too small. A large tarp can be folded, if necessary, but too small a tarp leaves the diver or some gear sitting in the sand.
Sand is the enemy of safe diving. Avoid getting sand on any of the gear during assembly, but be especially careful with first and second stages of the regular, the second stage of the auxiliary regulator, the air cylinder valve, anywhere on the BCD, the mask, and the inside of one’s wetsuit.
When sand gets inside a wetsuit, discomfort is just the beginning of trouble. An hour or more of movement during the dive allows that sand to chaff and scour your skin. At best, it can will just be an annoyance that eases at the end of the dive. A more serious situation develops when that sand is in the folds of sensitive body parts or at points of maximum movement, such as elbows, knees, and inside booties at points of contact with fins. Constant friction may create open wounds, which may become infected from microbes or other waterborne contaminants.
If sand is allowed to build up and remain in BCD, friction can scour the fabric or air bladder, contributing to stress failure or lack of buoyancy. Sand in the power inflator can cause it to stick open, filling the bladder continuously, or it can jam the inflator release valve, preventing air retention.
Only a very small amount of sand is necessary to cause a regulator second stage to free flow, and only a grain or two of sand can lead to catastrophic failure of a first stage. Divers who frequently gear up on the beach, often cover first and second stages of regulators with a plastic bag secured by a rubber band. They do the same with the low pressure hose where it will connect to the power inflator on the BCD.
Be mindful of sand that may get inside the mask face, especially if one has coated or tinted lenses, or if one has prescription lens inserts. That sand sometimes adheres to defog compounds, abrading the inner surface of the lens when washed about. An expense mask can be reduced to junk once enough scratches mar the lens.
Divers who gear up at their vehicle must also guard against contaminating their gear with sand or soil, if the dirt is windborne or if the area around their vehicle is not clear. They may also use a tarp to make doubly sure their gear remains clean during assembly. Veteran beach divers develop personal techniques to make their job easier, such as using a truck or SUV tailgate as an assembly platform. For sedan drivers, one may wish to lay the end of a long tarp in the trunk as a liner with the remainder of the tarp extending out of the trunk and onto the ground. Dive gear is loaded for transport into the trunk, on top of the tarp portion, and covered with the remainder of the tarp before the trunk lid is closed. Once at the dive site, the gear is uncovered with the tarp extending onto the ground, creating a clean surface upon which the diver can stand and dress.
Once equipment is assembled, the diver dons all the gear except for mask and fins. The mask should be placed over the head and around one’s neck, if it is not already tethered to the BCD. Fins remain off and will be hand-carried from the vehicle to the surf. The fins will not be donned until the latter portion of the surf entry.
Some consider the walk from one’s point of assembly to the water entry as torture; others consider it a pleasure because they remember they are saving a hundred dollar boat fee. Either way, the walk becomes easier with practice, especially with the anticipation of the great dive that is about to begin.
BUDDY CHECK
One cannot stress enough the importance of a thorough buddy check prior to leaving the assembly site and again, prior to entering the water. Every veteran beach diver has a one time or another been rushed or distracted enough to forget something important. Divers have been known to leave fins, masks, weights, weight pockets, lights, lobster gear, cameras, and other essentials back at the car or on the tarp. Some have entered the water with their car remote or cell phone in their pocket, hearing aids in their ears, eyeglasses on their face, or air valve turned firmly off. It can happen to anyone, and it will probably happen to you eventually!
To reduce the chance of embarrassment or inconvenience (or safety risk), check first yourself and then your buddy. Most agencies train new divers with a preferred mnemonic, and you may have yours. Using simple ABCDE (or your favorite), make sure you are really ready for the dive.
A – air valve fully on. Not partially on but wide open. The submersible pressure gauge may read what you think is full pressure, depending on your cylinder characteristics. Do not trust it. Tap your regulator purge to release some air and watch the gauge. If it deflects down and rises back to full, the valve may be open but maybe not all the way. If it deflects down and stays down, the valve is definitely closed! Check it yourself and have your buddy check it. Listen for air escaping the tank valve or anywhere along the regulator and BCD air system. It is common to have a worn o-ring with a substantial leak on the tank valve. The best time to locate and correct that problem is at the assembly point.
B – BCD should be in place with all buckles and snaps secured. Make sure webbing and straps are straight and not twisted or frayed. Pockets should be closed. The tank retention strap should be firmly secured; the web strap should be woven properly through the buckle, if it is the cam type. The low pressure hose should be installed on the power inflator and the inflator button should function without sticking. No air should be hissing into the inflator tube. Check the inflator release valve for function and make sure release togs on BCD vents are free and functional. The BCD should fit snugly but not too tight; it should not be too large or wobbly. The auxiliary regulator and console (if present), should be secured to the BCD.
C – computer should be tested for activation and battery charged. This is a good time to check other gauges and devices, such as SPG (functional and secured) and compass (functional and secured).
D – dive essential gear. Ensure adequate weights are present and secured. Fins and mask are also necessary to the dive; they should be in the diver’s hands as the check is conducted. If conditions dictate, a hood or gloves may be required.
E – everything else. This is the time to make sure the diver has a camera, lobster gear, spear gun, catch bag, writing slate, dive flag, reel, and anything else required by the dive plan.
Conduct this check again before entering the water. Things happen between assembly and water, such as gear dropped during the walk, a leak developing somewhere in the air system, tank retention straps working loose, weight pockets dropping out, or any number of simple failures. Locate and correct any issues before wading into the surf.
The final check before entering should be an inner one. Are you ready for this dive? Do the conditions seem right? Do you have any concerns or reservations? Do you feel healthy enough, alert enough, and strong enough? If you have any doubts, talk it out with your buddy or the group. Do not continue with the dive, if you are not ready for it in every respect. Remember: any diver can call off their dive at any time for any reason. The water will still be there when you are ready, so make sure your attitude is as prepared as your gear.
SURF ENTRY
Nothing so defines and distinguishes beach diving from boat or pier diving as the surf entry. On the calmest days, when waves gently lap the shore, one wades in as into a shallow aquarium. At such times, it is easy enough just to kneel beneath the surface, and swim among the fish over the sandy bottom until one reaches the reef. On windy, choppy days, a bit more care is necessary negotiating 2-3’ waves that hinder your approach, and strong undertow trying to sweep your legs from beneath you. When top-heavy with a weighted BCD and air cylinder, one is challenged to stay upright until past the breakers and into deeper water.
The best time to beach dive for the first time is that calm day. When it feels like you are wading into a blue lagoon in sultry tropical weather, you can focus on all the other aspects of the entry that are new to you. If conditions are rougher and more challenging, you may be distracted by cresting waves and forget about mask placement or you may drop the fins you are still holding. Good training will prepare you for entering in all acceptable conditions. It will also provide you with an idea of when to back out and wait for another day.
Appropriate conditions vary from diver to diver. They differ according to level of experience and degree of desire for the dive. Beginning beach divers should limit themselves to days when surf is one foot or less and winds are less than 10 mph. Wind direction should either be mildly off shore or on shore at an angle of no less than 45 degrees to the shoreline. Any less than 45 degrees produces near shore currents and undertow effects that can at times be tricky.
As you gain experience, you gain a feel for the amount of surf and wind you can tolerate. You will learn that rough surf does not always indicate a rough dive, but it always adds an element of caution to entries and exits. You know you will have to walk in against incoming waves, manage your footing with tricky undertow, and stay in control on the initial surface swim with rollers beyond the breakers.
Veteran divers know that end of the dive surf conditions influence the go-no decision just as much as entry conditions. After a challenging entry, a surface swim out and again back in with an hour dive in between, the diver will be tired. One may also be carrying a bag of lobsters or a stringer of fish. When exiting, one is not fighting against the waves as much as preventing them from rolling you under and washing you ashore like a beached whale.
When conditions are favorable and the pre-dive check is complete, it is time to begin entry. Add air to the BCD enough to keep you afloat should you lose your footing. Place your mask on your face as you will wear it during the dive, ensure the strap is firmly around your head. Holding your fins, begin walking into the surf, seeking sure footing with each step. Your buddy should be entering within six feet to either side of you, in case one of you needs the other.
Some divers prefer to enter with their regulator secondary in their mouth. That is not a bad idea, especially if the water is rough. The secondary is protected from become sandy, if one goes down, and it provides a source of air, preventing the diver from ingesting sea water. When the water is calm, however, and one is confident of footing, regulated walking may expend one’s air supply unnecessarily.
Once one is in water above the knees, turn to face the shore, and continue into the surf walking backwards. This is an old beach diver trick learned by too many the hard way. When facing waves, one’s center of gravity is more toward one’s back where the weight of the air cylinder is located. A forceful wave can move a diver backward and off balance more easily in that configuration. When walking backward, the tank takes the force of the wave first, and any off balance movement is directed toward deeper water where BCD buoyance is helpful.
Continue backward until the water is just above waist level. At this time, you may don your fins using the standard figure 4 stance. If you have enough air in your BCD, you may sit slightly, letting the water take your weight as you fit your fin on each foot. Ensure straps are firmly in place behind the heel and the fit is snug or you will lose a fin in the surf. This depth of water is not too much to allow buddies to assist each other with fins, when necessary.
SURFACE PROPULSION
With fins on, it is time to begin the surface swim. You have a choice of two styles of propulsion. Many books on shore diving recommend a face down, snorkeling posture which allows the diver to see underwater while traveling. If visibility is good enough, this is an enjoyable style, especially if there are sights to see and if it is possible to navigate by reading the bottom. If visibility is poor, however, one may become disoriented, dizzy, and bored.
An alternate style preferred by many experienced beach divers involves swimming backward away from the shore. BCD buoyancy keeps one’s head well above water, where one can navigate more easily and breathe more freely. It also allows for conversation with dive buddies prior to descent. This style of propulsion is much more efficient than face down, and it adds much pleasure to the overall dive experience.
During surface swims, groups should stay close around their dive flag with no more than 4-5 divers per flag. Every diver should be vigilant for approaching boat traffic. At full throttle, a boat may be traveling at 20-30 mph, which means an unsuspecting boater may be upon the group in seconds. If an approaching boat does not veer away at least 300 feet from the flag, pop in that regulator and descend immediately. Remain at least 15 feet underwater until the boat is well past the group. Ascend carefully afterward, remembering that another boat may be approaching from any direction.
Divers should be considerate of all team members when moving as a group on the surface. Some divers cannot swim as fast as others, so group speed should be adjusted accordingly. No diver should ever be left behind alone and no buddy team without a flag should be separated from the group. If a diver finds it necessary to return to the shore for any reason, that diver should be accompanied by at least one other with a flag. The accompanying diver may stay ashore or may resume the dive, if another diver is along for the swim. Thus, two divers return to the shore and stay, or two divers escort the third who stays and the two remaining resume their swim.
The surface swim allows divers to judge current flow. Visual contact with landmarks on shore provide a reference for relative movement during the swim. Landmarks 100 yds to the south after 10 minutes of swimming, indicate a north current moving at 600 yds per hour or .3 kts. This is valuable information one should include in dive planning, adjustment, and navigation.
DESCENT
Once the team reaches an approximate location of the dive site, it is time to descend. Buddy teams should prepare together and should never descend more than two arms length (6’) apart. Many divers will choose to descend as they were taught in basic open water class: in an upright position, discharging air from the BCD inflator held over the head, and descending feet first. This is a good style to maintain visual contact with one’s buddy. It also allows one to orient with landmarks on shore, which enhances navigation continuity.
Descending feet first, one must be aware of approaching the bottom or any structure beneath the surface of the water. Visibility should not be so poor that you cannot see your feet, but there may be seaweed or other conditions close to the surface that obstruct one’s view. Never drop so fast that you do not have control of your buoyancy and do not descend beyond reach of your dive partner.
Another style of descent allows the diver complete control of buoyancy and provides visual contact immediately beneath the surface while swimming forward and downward. To accomplish this posture, discharge enough air from the BCD to drop your head beneath the surface. In this neutrally buoyant state, become horizontal and slowly begin swimming slightly downward with your buddy nearby. You would have noted your proximity and position relative to shore as you submerged, so navigate by visual contact with the bottom or by compass heading.
One should maintain constant awareness of four factors immediately upon submerging. Compass heading and relative position are the least of these factors. You should never be lost, to the extent that you have no idea where you are or where you are going. As important as that knowledge, the other three factors are even more essential to safety. They include awareness of your breathing gas supply, your depth and no decompression limits with time at that depth, and the location of your partner.
If you descend and have any doubt about your location, you must ascend and establish awareness by navigating on the surface. If surface currents have taken you too far outside your dive plan that you cannot adjust and resume the plan, abort the dive, and return to shore. Current strength and direction should have been a factor in your dive plan, but no plan is perfect and conditions are often unpredictable. It is better to be safe and plan another dive, than to attempt recovering a doomed plan.
If you descend and cannot locate your buddy, initiate missing buddy procedures immediately. Look around in all directions, including up and down, for no more than 60 seconds. If you do not locate your buddy in that amount of time, ascend safely and look on the surface. Your buddy should have followed the same procedure, and should be either waiting for you up there or will surface shortly. There are no excuses for partners to separate in an unplanned manner and not follow a missing buddy protocol.
Upon reaching one’s target depth, assess conditions according to the dive plan. If conditions are beyond those allowed by the dive plan, follow the procedures you planned for aborting the dive at that point. Unacceptable conditions include restricted visibility, excessive currents, and unknown dangers such as entanglement or structural hazards.
When aborting a dive becomes necessary, it is always better to do so when you still have most of your resources available. Those resources include breathing gas, physical energy, and mental acuity. Diving under severe conditions takes a toll on your air supply, your strength, and your ability to think clearly, leaving them depleted below safe levels the longer the dive continues. At such times, remember there are old divers and there are bold divers, but there are no old, bold divers!
UNDERWATER NAVIGATION
A diver who boasts they never need a compass because they have perfect inner sense of direction is not to be trusted. No one can determine direction underwater without references. Underwater disorientation is more dangerous than being lost in a fog on land; the water is always moving, water is unbreathable, and one cannot wait indefinitely for the “fog” to lift underwater. If you are unskilled in underwater navigation, seek training, and become competent in both natural and mechanical references.
Natural references include known current flow, known structures and features (such as reefs and wrecks), angle of sun rays, and flora/fauna orientations. Even ripples on bottom sand provide reference by indicating predominate wave action (ripples generally run parallel to shore). If terrain features are available on marine maps, copy them onto a dive slate for use underwater.
Mechanical references such as analog and digital compasses are inexpensive and easy to use. Compasses cannot tell you exactly where you are, but they provide a reliable indication of cardinal directions. At this time, no practical or affordable GPS units exist for the average diver, but people have been navigating without satellite assistance for over a thousand years using simple, magnetized needles. Your compass should be to you a familiar and constant companion.
By prior agreement, one team member should have primary responsibility for navigating the team through the dive plan. That appointment frees other team members to focus more on dive elements, such as photography or lobster hunting. The navigation leader remains aware of the activities of the other divers. If they pause to take a picture or snag a bug from under a rock, the leader should wait for them to finish that task. It is never acceptable to leave divers behind just because they stop to smell the roses.
Although one team member is acting as navigator, individual divers are not absolved of the responsibility for their own dive awareness and safety. People make mistakes and compasses can fail, so all divers should know where they are and where they are headed. If the leader seems to be off track, other divers can bring the error to his or her attention. The sooner a deviation is noted, the easier it will be to remedy the issue.
TEAM AWARENESS (The diver with the flag is NEVER lost!)
Diving with friends is a great way to share the wonders of a great site, but in this case, there can be too much of a good thing. No matter how close you may be to the other divers, the group can never be your buddy. Even under the most pristine conditions, it is unlikely a group can stay close enough that all members can remain in visual contact with each of the others. It is simply too difficult to keep track of three or four or more other divers underwater.
Two people make one buddy team, and they can add a third without too much trouble. When you have a foursome, you have two buddy teams. Buddy groups can swim in proximity to each other, but every diver is only accountable for one, or two at the most, other divers. Partner arrangements should be finalized prior to entering the water.
Team members should be aware of any situation that may affect group progress. The sooner that information is available, the better it is for the dive plan. If a group of divers wish to remain somewhat together throughout the dive, the slowest swimming diver sets the pace for the group. If during the dive, a diver develops a handicap or assumes a load, such as a full bag of lobster, that diver becomes a burdened diver. The diver carrying the flag reel is towing a floating buoy and over 50 feet of line through the water, a task involving tremendous drag, is a burdened diver. The burdened diver sets the pace because he or she simply cannot catch up to faster swimmers.
Any diver not carrying the flag line has the responsibility to know who has the flag and to stay near that diver throughout the dive. That flag on the surface is an essential safety device when divers ascend. In some locations, it is a legal requirement to have a dive flag when more than 100 feet from shore, and divers are required to be within 50 feet of that flag when on the surface. As well as being the law, it is good practice to be near the flag that boats must avoid by 300 feet.
When the dive reaches its conclusion and the group is ready to ascend, ensure all group members get the message. Never assume divers on the fringe will see others ascending and join in automatically. A diver or buddy team may be focused on photography, noticing others are missing after the picture is complete. According to protocol, they will search for the group for one minute before ascending themselves. That 60 second delay might allow the group already on the surface to drift or, more likely, swim far enough away to create an undesirable separation.
RESOURCE MANAGEMENT
Experienced beach divers become excellent resource managers. They know that whatever air and energy they brought from shore must last them until they return. Boat divers can often just ascend to climb back on board when they become low on air or they feel tired. If that happens to beach divers, surfacing solves the air problem, but they still face a long swim back to shore. There are no shortcuts in open water.
Most scuba training and textbooks teach the wisdom of managing one’s breathing gas supply. Whether air, Nitrox, or mixed gases, there is only so much available in that steel or aluminum cylinder. When it is gone, it is gone, and there is no substitute underwater. (For the purposes of brevity, we will use the term “air” most of the time when referring to breathing gas.)
Proper air management begins with knowing one’s surface air consumption rate. This is the amount of air one breathes at one atmosphere (ATA) in one minute. If you don’t know what your surface air consumption (SAC) rate is, you can measure it by swimming casually on the surface for 20 minutes, breathing only from your regulator. Prior to beginning, take an accurate measure of the amount of air in your tank.
Here is where it gets tricky because you must convert pressure readings into volume. That means your final SAC calculation will be in volume, which is applicable to any size tank you may use. Pressure readings from an 80 cu/ft tank differ in volume from those in a 63 cu/ft tank; those from low pressure (LP) tanks will also differ from high pressure (HP) tanks, even if they are the same size tank. If you know your SAC in volume, conversion to any size tank becomes much easier.
Here is how that conversion works. Your initial reading on your 80 cu/ft tank is 3000 psi, which is the operating pressure for that cylinder. Thus, you have 80 cu.ft. of air available to use. After 20 minutes of swimming on the surface, your pressure gauge reads 2250 psi. Thus, you have consumed 750 psi, which is 25% of your total amount. You began with 80 cu/ft. 25% of 80 cu/ft is 20 cu/ft. Divide that amount by the length of time, which was 20 minutes. 20 cu/ft divided by 20 minutes equals 1 cu.ft. per minute.
When you know your SAC rate is 1 cu.ft. per minute, you can estimate how much air you might consume, under ideal conditions, at greater depths. If most of your dive will be at 66 ft in salt water, which is 3 ATA, multiply your SAC by 3, to estimate consumption of 3 cu.ft. per minute. That means that an 80 cu/ft tank would last just over 26 minutes at 66 feet before it is completely empty.
That is simply a rough estimate. A lot more goes into sophisticated air management, especially for those planning a technical dive, but you get the idea. The good news is that most beach dives are not much more than 33 feet deep, which translates to 2 ATA. If your SAC rate is 1 cu/ft per hour, that 80 cu/ft tank will last at least 40 minutes at depth.
Most experienced divers will find their SAC rate is considerably less than 1 cu/ft per minute. Divers tend to have a higher SAC rate as they are first learning scuba, which rate improves dramatically as they gain greater buoyancy control and swimming trim. It is important for divers to know their SAC rate to plan conservatively their air management. It is also necessary to note that one’s SAC rate may be significantly affected by health conditions, water temperature, current strength, and stress level at any given time. One may safely estimate that rate will only increase when diving conditions are anything less than ideal.
Including air management in one’s beach plan means deciding how you apportion your air supply. Some divers use a Rule of 3rds for their plan: 1/3rd of one’s supply for the first half of the dive, 1/3rd for the last half, and 1/3rd reserved just in case. Others subtract 1/6th of the supply (500 psi on an 80cu/ft tank) for surface reserve, and knowing the surface is only 25 ft away, apportion ½ of the remainder for the dive mission (ea. reef tour, lobster hunting, wreck exploration, etc.), and the final half for the trip back in underwater. If you want to spend more time on the reef, use all 5/6ths for the mission, saving the final 1/6th for the surface swim.
Reserving 1/5th of your supply (or 500 psi on standard 80 cu/ft) is very important for two reasons. First, one must maintain positive pressure in the cylinder to prevent water from entering through the valve or valve seat. Secondly, one needs to be able to descend and remain below if a boat approaches during the surface swim. That amount of air should be sufficient for the few minutes it might take to avoid injury.
Buddy teams, if not the entire group, should agree that buddies remain together, even if one runs low on air and must ascend. The advantages of the buddy system only work if the dive partners stick together. It may mean one buddy misses a portion of the dive, even though still carrying plenty of air, but it also means, the diver with no air is not alone and at risk for the remainder of the dive. It should be a team principle that no diver is ever left behind.
LOST BUDDY PROCEDURES
Group members should review missing buddy procedures before every dive, especially if divers new to the group are present. Adapt elements of the protocol to the group and to existing dive conditions. For example, if wave height is more than one foot, divers may not wish to search a full minute before ascending. The primary purpose for that time limit is to prevent undue separation between divers. The longer divers search for one another, the further apart they are likely to become, and the more difficult it may be to see one another once among the waves above.
There are many reasons why divers may become accidentally separated, such as momentary distraction, sudden decrease in visibility, or strong current, but only two reasons partners become separated intentionally. If a diver experiences a personal emergency and cannot immediately share that need with buddy, that diver may make an controlled ascend to address the issue. If divers maintain no more than six feet of lateral separation and regular visual contact, that emergency can usually be addressed with standard scuba procedures. Still, accidents do happen, and that is one example.
The other reason is more common. Intentional separation may occur when one diver decides to swim off on a personal quest for discovery. This happens more often than it ever should, and it is an unforgiveable violation of scuba safety and of diver etiquette. The selfish diver has abandoned his or her buddy, who will likely experience the angst of searching below for a full minute before surfacing to an empty sea. That diver will then make an anxious surface swim ashore alone and at risk. It makes little difference if the offending partner stumbles ashore sometime later with a guilty smile and one last lobster snagged. The diver who intentionally violates safety rules and plan arrangements cannot be trusted not to do so again.
INCIDENTS AND EMERGENCIES
A good dive plan includes provisions for things that happen. Certification and advanced diver training address most situations that may occur underwater. Some situations may be more likely depending on dive conditions, such as cold water, rough water, or low visibility conditions, so plans should emphasize these factors. For instance, when visibility is less than ideal, reduce separation distance between buddies or use a tether. The fact remains, however, that unplanned situations can arise at any time.
The formula for trouble is the same for everyone: situations lead to incidents, which may turn into emergencies before becoming accidents. Recognize situations as they develop, addressing them before they become incidents and lead on to worse conclusions.
Many incidents can be avoided before dives begin. A team member who exhibits anxiety during gear staging, or one whose gear is assembled improperly, or one whose gear becomes problematic or defective, is an accident looking for an opportunity. A burst o-ring during assembly is one thing, but split hoses, torn regulator or missing regulator mouthpieces, missing weight pouches, and half-filled air cylinders, are signs of a more serious deficiency.
Another situation commonly ignored before the dive begins involves environmental or circumstantial conditions at the dive site. When conditions exceed those originally planned, divers must consider carefully whether the dive should continue or be rescheduled. Deciding to “go for it” even though the surf is twice as high as predicted or the local boating squadron is conducting their regatta directly above the reef, is not a wise choice. Consider how one’s decision will appear in retrospect if an accident occurs.
Situations also occur once the dive begins. They can and should be addressed without delay, before complications develop. Simple problems become serious issues when ignored. Also, situations can have a cumulative effect, in which can create a greater impact than the sum of the situations themselves. For this reason, the author has long practiced the three strike rule.
The three strike rule has nothing to do with baseball, but is based more on the old adage that “trouble comes in threes.” The principle is not that there is a universal phenomenon requiring disaster to only occur in triplicate. Instead, it deals with the observed likelihood of one problem contributing to circumstances that contribute to the development of others. This precaution has been a practice of pilots in cockpit resource management, and it has sound application to risk management for divers underwater.
The rule is as follows: The first situation or incident that occurs is counted as Strike One. Divers should become especially alert to the occurrence of a second situation, which will become Strike Two. If that second occurs, the possibility of a third has increased. It would be a mistake to wait for Strike Three before taking decisive action on aborting the dive. The third problem, when added to the first two, may create an overwhelmingly unsafe condition for divers involved.
Strike Two is the decision point. Because the third problem is likely, if not imminent, ending the dive after Strike Two means that, if Strike Three occurs, it will be during the return to shore. If it does occur, the impact of the problem and its cumulative effect may be mitigated by the fact the team is closer to shore. Agree among the dive team that the game is over on Strike Two to avoid time otherwise lost dithering on decisions.
Consider a likely scenario. During the surface swim, a diver suffers a broken fin strap buckle. The diver and his partner fix the buckle temporarily, but now the fin is loose and the diver must swim a bit slower. It also seems the buckle is likely to fail again at any moment. The team decides to continue the dive, allowing for the impaired diver to set the pace. Halfway through the underwater tour on the reef, the diver’s partner develops a significant but not dive-ending leak on his regulator first stage. It appears the o-ring is worn, as indicated by a steady stream of bubbles.
Should the dive continue underwater or should that buddy team abort and make a controlled ascent? Consider the consequences if they continue. 15 minutes later, having been at 40 feet deep in the ocean for 45 minutes, with one diver unable to swim properly because of his broken fin, his partner suffers a catastrophic failure of the o-ring. The partner is unable to breathe from his regulator because air is venting from the first stage. He must use his buddy’s alternate air source. They are both faced with the necessity of making a controlled ascent with only three working fins and one air source.
Is there now a likelihood of even further trouble developing? Of course, there is. How much better it might have been had they surfaced after Strike Two? They would have been on the surface when the catastrophic failure occurred, which would have been no problem at all. Continuing the dive, however created a high risk of some form of decompression injury during a stressed, problematic ascent. Observing the Three Strike Rule manages risk more reasonably.
Following any dive that involved problematic situations, teams should discuss the events in a debriefing session. Review contributing factors and assess effectiveness of individual or team response. If changes in future dives seem necessary, the experience can become a positive learning experience. These will probably be lessons team members remember for a long time.
RESCUE
Some situations turn into incidents. A few incidents become emergencies, but they do not need to become accidents. Training prepares divers to recognize and act appropriately to the most distress situations. Among the most common are out of air, gear failure, diver fatigue, diver panic, sudden illness or severe cramping, and harmful contact with nature.
Out of air situations most often occur because of poor planning or failure to manage one's resources during the dive. It is also not uncommon for one to underestimate the amount of air they would consume swimming against a current, swimming a long distance underwater, or as a result of energy expended during a long surface swim.
Fortunately, this situation is taught early and often during basic open water training, so most divers should be familiar with its two possible solutions. It is also good that most beach dives involve depths of less than 30 feet and rarely with any overhead obstructions.
The onset of this condition may occur as you check your SPG, finding it indicates much pressure than you expected. If you are at 500 psi, you may still have a few minutes of air left at 25 feet. It is time to notify your buddy. Your dive is nearing its end and you must plan your ascent. There is enough time to make an easy, controlled trip to the surface.
If you are at or below 200 psi, you are almost to the point where you will be sucking the last air from the cylinder. You are not completely out, but you need to save some as a reserve for the surface. Signal your buddy that you are out of air and accept his alternate air source (spare regulator), maintain close contact, and make your ascent together. Inflate your BCD manually, to conserve what air you have left in your tank.
Sometimes a diver gets no warning of air exhaustion. Whether from poor management or from an undetected leak, the cylinder becomes completely empty. The first indication the diver experiences is difficulty drawing air through the regulator. One breath is different, slightly difficult. The next requires real effort to draw anything out. The third breath is usually impossible. The tank is empty.
There is still no reason to panic. You trained for this possibility. Turn to your buddy, make the appropriate signal, accept his spare regulator, and make a controlled ascent.
If your buddy is not near enough, or for any reason unable to assist, your only choice is a controlled emergency swimming ascent. This is another skill you should have mastered in basic open water training and, hopefully, might have practiced a few times since. With your regulator still in place, raise your right arm toward the surface, hold the BCD inflator valve in your left hand to vent excessive air created by the ascent, open your airway by lifting your face toward the surface, and begin swimming slowly upward, humming softly to vent the air expanding in your lungs. Once on the surface, keep kicking upward as you manually inflate your BCD. Your buddy should be joining you within a minute or so.
The controlled emergency swimming ascent is a simple maneuver that should be a part of every diver's repertoire. One can easily perform it from 60' deep. If done correctly, the diver is still humming when reaching the surface. It is not the most desirable way to end a dive, but it is the only option when one has no other source of air at depth.
If it is your buddy who runs out of air, you have a job to do. You must be alert to signs of distress and be available to assist as needed. If you notice your buddy's first stage or supply hoses leaking, you must alert that person of an impending loss. Plan accordingly, if the leak is small and plenty of air remains in the tank. With a large leak or little air remaining, the choice is clear: share air and surface.
Good training, practice, and presence of mind will enable you to keep your buddy from panicking. Remain calm and confident, share your spare regulator, ensure your buddy is able to breathe easily through it, maintain positive contact with your buddy, and swim upward together. Help your buddy stay afloat on the surface, as he or she manually inflates the BCD. You might have to assist with this task, if your buddy is confused by the urgency of events.
No matter where you are when this occurs, the dive is over. Even if the impaired diver still has some air remaining, both must head to shore. Even if the impaired diver insists on the other diver continuing the dive, remain together during the swim to the beach. There no good reason from abandoning one's buddy in the water, unless he or she is entangled, unable to get free or move, and you must go for help.
Gear failure, such as an air leak, never needs to become an emergency. With training and awareness, divers can be prepared for almost anything that can happen. Even a catastrophic failure of the tank valve o-ring, which sounds like an explosion underwater and can empty a full cylinder in minutes, can be managed with basic procedures.
Other failures may be less dramatic but each has a logical solution.
Burst o-ring or broken hose: Both of these failures are capable of draining the tank. Rapid air release will reduce pressure to the second stage regulator, so this diver's buddy must supply air during a controlled ascent. Once at the surface, disconnect the low pressure line from the inflator valve to maintain buoyancy when the BCD is manually inflated.
Broken fin strap: If the strap cannot be made functional, the buddy team must surface and make their way to shore.
Broken mask strap: Some masks will stay in place and maintain a reasonable vacuum without a strap but the impaired diver must be ready to affix it should it shift. If the condition is unmanageable underwater, the dive is over.
Leaky BCD: Bubbles streaming out from any point on a BCD, whether vent, seam, inflator connection, or the bladder surface, does not indicate imminent failure. If the BCD maintains buoyancy well enough to only need replenishment occasionally, it is functional enough to continue the dive plan. Of course, it warrants a close inspection and probable maintenance later, but a small leak is no big problem at this point.
Stuck inflator valve: A common issue, the solution for which one should have learned in certification training. Disconnect the low pressure hose from the inflator valve. Inflate orally, as needed. There was a time when buoyancy compensators did not have power inflators, so the dive may continue old-school fashion.
Failed BCD: This type of failure sometimes occurs by inadvertent bladder puncture or mechanical breakage of the inflator hose. If the diver is unable to maintain neutral buoyancy as a result of this failure, the dive should be terminated. Buddy assistance may be necessary for a controlled ascent. Once on the surface, the diver may inflate the SMB, placing the tube around back and under both arms to assist with buoyancy during the surface swim. Otherwise, that diver will require the assistance of buddies to remain afloat.
Lost weight pocket: This may or may not be a problem. Most divers are over-weighted (carrying too much lead) to begin with, so losing even 50% may not be significant. If the diver was properly weighted and neutrally-buoyant when the pocket was lost, however, the diver can adjust buoyancy, and look for the pocket with the assistance of the buddy. If the weights cannot be located and the diver cannot maintain buoyancy control, the dive has ended. The likely result of continuing with one diver attempting to stay at depth by swimming against his or her buoyancy, is rapid expenditure of air and energy, an increased stress level, and an unnecessary distraction that might lead to a more difficult situation.
Flooded or inoperative dive computer: A failed computer is not as serious a problem on a beach dive as it might be on a deeper dive, but it does present a challenge. Even with a functional computer, one should know the non-decompression limit (NDL) of the dive profile. The computer measures depth and time, calculating remaining NDL for the convenience of the diver. If the computer fails, and the diver has a dive watch, he or she has the option of continuing within the NDL parameters, as long as the depth remains within limits. Many beach divers forgo a dive computer on dives less than 30 feet because no-decompression limits are so generous, usually far longer than one's air supply would allow.
Flooded or inoperative SPG: Scuba divers have not always had the luxury of submersible pressure gauges. They knew their air consumption rate and calculated their dive plan according to that. When their dive watch indicated they were near the end of that plan, they ended the dive and ascended. Later, tank valves included a 500 psi reserve function. When the divers felt resistance inhaling through the regulator, indicating their primary fill was near exhaustion, they pulled the lever that opened the reserve. Unless you have an old-fashioned J-valve with a reserve lever, you should end the dive should your SPG fail.
ASCENTS
When the underwater portion of the dive plan has concluded, dive buddies must make a controlled, gradual ascent together. Every diver should remember a few important factors regarding beach dive ascents.
First, remember there is no boat waiting at the surface. That means there is no vessel to motor around collecting separated divers. A team diving together should assemble below and rise together, ensuring all are present at the surface. If all team members are not aware of the decision to ascent, some may be left behind, causing unnecessary confusion and separation of divers.
Without a boat at the surface marking the location of divers underwater, it becomes especially important for surfacing team members to be within 50' of the dive flag. Boats operating in the vicinity of the dive site may be avoiding the dive flag, as required by law and common sense, yet they may be unaware of surfacing divers hundreds of feet away from the flag.
Secondly, the ascent should be controlled to the point that it is not an incautious rush to the surface. Before departing the dive depth, listen for sounds of boats operating in the area. An experienced diver will recognize the sound of propellers. If a boat is approaching, delay the ascent until it passes, if possible. Even if no boats seem near, rise cautiously, scanning in all directions as soon as breaching the surface. Be prepared to descend immediately, if necessary.
Finally, remember the physiological consequences of ascending too quickly. Depending on the depth of the dive, one or more team members may require a safety stop at 15 feet, as prescribed by safe diving standards. Such a stop, for at least 3 minutes, allows your body to adjust to the change of depth. It also allows excess nitrogen in your tissue to release through respiration.
A great alternative to a safety stop is to swim to shore underwater. If you have enough air to make the trip, continue your dive, rising as the bottom slopes upward toward the beach. The slope is usually gentle enough to take more than three minutes rising from 20 to 10 feet. Most veteran beach divers include the underwater trip to shore as a part of every dive plan, especially if there is more to see during the swim.
A second physiological danger to rapid ascents involves an overexpansion injury to lungs or sinus cavities. Your trip to the surface should never be any faster than one foot per second, with one foot every two seconds recommended. A long, gradual swim underwater solves that problem just as well.
SURF EXIT
As your return surface swim approaches the surf zone near the beach, it is time to prepare for the exit. Secure all gear not already tethered. Anything you carry in your hands may be dropped, and anything that sinks in frothy surf will likely be lost for good. This is especially true for night dives.
If you feel winded from your surface swim, this might be a time to catch your breath. You will need your wits, wind, and energy to navigate the surf zone. Enjoy the fact that waves generally do not crest until they reach shallow water. That creates relative calm just before the bottom of that wave (2/3rds of most wave height is beneath the surface) locates the sand bar. Use that zone to gather your strength for the next steps.
If you had your mask off to breathe easier during the surface swim, it is time to secure it in place over your face. Should you stumble when walking out, not only will that mask be fixed in place, but you will be able to see better as you recover. Speaking of stumbling, having your regulator in your mouth reduces the risk of ingesting water if you lose your footing. It also prevents the regulator from collecting sand stirred by wave action or worse, being dragged through bottom sand, if it is hanging loose.
Your BCD should already be inflated to support you during the surface swim, but if you want to add more, this is a good time to do so. Once you reach a depth where you can stand securely, remove your fins so you can walk more easily toward the beach. Secure your fins to the BCD with clips or tethers. If you carry unsecured fins in your hands, they will be the first things lost if you stumble or must open your hand to assist your buddy.
Buddies should walk ashore no more than six feet apart abreast of each other. As during the entry, keep that air cylinder between your body and waves approaching from behind. Anticipate wave action as much as possible if the surf is high enough to be of concern.
Slow and steady is the pace that works best on exits. Keep moving toward the shore, remembering that there is sometimes a drop off where receding water meets oncoming waves. Prepare for that step up, and let the wave action work for you rather than against you. Be ready to assist, in case your buddy forgets that ledge and stumbles at that point. It is very difficult to stand to one's feet after a long dive at practically zero gravity, then having to stand erect with an additional 60 lbs on your torso.
If one is unable to stand, do not linger where crashing waves will continue to pummel you. Crawl on hands and knees beyond the wave action. Go as far up the sand as you feel necessary before stopping. It is safer for you and your gear to remove it at that point. If it is your buddy on his or her knees, drop your BCD, mask, and fins on the dry sand, then return to help that diver, and any others, ashore.
Make sure the entire dive team exits the surf safely. Never assume that everyone will make it until they do. Even the most experienced diver sometimes needs assistance.
If any divers are not present, assess the situation immediately. Who was the last to see that person? It is better if two are missing than just one, because that means a buddy team may still be together. Still, they must be accounted for and it is time for everyone to share what they know.
Team separation procedures must be established before the dive. The dive plan should include a comprehensive description of those procedures, but at the very least, every team member should have an idea of what to do if they become separated from the team in an unplanned manner. Two key elements of those procedures include the latest time the submerged portion of the dive should end and the rallying points.
Maximum possible underwater time varies as widely as there are divers in the team. Some will have cylinders with greater capacity than others. Also, each diver has a his or her own SAC rate. Multiply those two variables for the myriad options available within the team. Thus, the group should establish the time by which all divers should be present on the surface.
Unspecified end times is a poor practice for safety-minded dive teams. If one buddy team, comprised of two divers with large capacity tanks and low SAC rates, was to remain underwater until they ran out of air, significant separation among the team may occur. The remainder of the team, unaware of that pair's intentions, may waste unnecessary time and effort seeking signs of their buddy's on the surface or on the beach. Worse than that, if a buddy pair is actually imperiled, valuable rescue time may be lost, if other team members assume they are just taking their time for one more lobster or a few more photographs.
By the maximum dive time, all team members should either be on the surface or mustered at one of three rallying points. The primary location should be that chosen for the exit, as planned. Two other locations should also be identified, which would be locations on either side of the primary exit. Those two contingency sites allow for the effects of either longshore currents or flawed navigation. Either event is possible; factoring them into the dive plan prevents unnecessary confusion.
DISASSEMBLY AND DEBRIEF
One of the pleasures of scuba diving that is enjoyed by those in few other sports is the shared sense of adventure and discovery. The final phase of every dive event is almost as fun as the underwater portion, because divers relive the best moments of what they just experienced. The fact that the memory is only minutes old makes it the most detailed and vivid it will ever be.
Fresh recall is best for reviewing elements of the dive that may be useful in future planning. The sooner divers can record relevant information, the less likely that some details will be forgotten because they were overshadowed by more remarkable ones. You never know the role some lessons learned might play in future dives, so note them as early as possible.
For instance, as you began your descent at the dive site, the reel attached to the dive flag line kept jamming, instead of unspooling smoothly. That problem delays your descent, meaning the rest of the group had to wait for you and your buddy to arrive at depth. During the remainder of the dive, it was not necessary to pay out line from the reel, so the issue was easily overshadowed by other elements of the dive. Unless you remind yourself to inspect the reel and correct the jamming problem, it will likely occur again on another dive. On that occasion, rather than being just an inconvenience, the delay may cause significant separation between you and the rest of your group, or worse, between you and your buddy.
Record problematic details of any dive before any others. Many divers keep written or digital logbooks, in which they list depth, duration, sea state, breathing gas, and many other relevant facts. Make note of difficulties first before you forget them. Memory can be capricious, and it becomes fickler as we age. If only a few scribbled words on a scrap of paper left on the dashboard before you disassemble your gear, make a reminder to yourself to address the issue at hand.
Gear disassembly is a process like the break down phase on any other scuba event. The exact steps involved differ according to each diver, but sometimes veteran beach divers add a few specialized twists. One such particular is the special attention they pay to handling their regulator set during disassembly.
By its nature, beach diving exposes equipment to sand, dirt, and silt, much more than boat diving. Thus, when removing one’s BCD, take care to place it on a surface that is as clean and clear as possible. Support the second stages, instrument consoles and other dangling appendages of the regulator set as you set the BCD down. Sand and grit will adhere quickly to wet gear, and it sometimes gets in places where it is difficult to remove. Second stages are notorious sand collectors, which almost ensures a free flowing regulator, if not thoroughly cleaned.
It is best if the entire rig can be rinsed with running fresh water before further disassembly, but if that is not possible, at least rinse the regulator first stage and tank valve with fresh water, perhaps from a bottled source. Fresh water washes away salt residue from ocean dives, and silt from lakes and rivers. You want to remove anything that has the potential for entering the intake port of the first stage. Rinse, clean, and dry the first stage and the tank valve. A contaminated tank valve or a gritty intake screen may introduce particulates to the first stage, where they may damage inner surfaces or otherwise cause a malfunction. The close tolerances within a first stage are precise. It does not take much contamination to ruin it.
Clean and dry the intake plug before inserting it. Most first stages carry an intake plug attached by a short line while the regulator is in use. Whether din or yoke adapted, these plugs become sandy and soiled, so they must be cleaned completely after the dive and before use.
After removal, set the regulator apart in a safe place. Return it to an appropriate storage bag, if possible, and ensure it is set where no one is likely to step or sit on it.